
Android: Unlock and Rooting
Unlocking or rooting an Android device can offer significant advantages in a variety of testing scenarios, ranging from gaining access to system files and facilitating app development and debugging to assessing custom ROMs, conducting automation testing, and evaluating network and performance functionalities. Additionally, these processes are instrumental in research and development efforts and contribute to tool validation and comparisons.

Unlocking or rooting an Android device can offer significant advantages in a variety of testing scenarios, ranging from gaining access to system files and facilitating app development and debugging to assessing custom ROMs, conducting automation testing, and evaluating network and performance functionalities. Additionally, these processes are instrumental in research and development efforts and contribute to tool validation and comparisons.
It's crucial to emphasize that when embarking on the creation of synthetic test data, the process should begin with a device that is rootable or unlocked. This implies that the device has been unlocked by the carrier and can be placed into bootloader mode. It is strongly advised against purchasing a device from platforms like eBay to mitigate the risk of encountering potentially compromising content like Child Sexual Abuse Material (CSAM) on a device that has not been thoroughly wiped clean. Notably, iOS device factory resets will suffice to fully wipe a device including contraband content. Ensuring the origin of the device is essential to maintaining the integrity of the synthetic testing process. For the purposes of the blog post, a new Google Pixel 6a was utilized, procured directly from Google. This walkthrough demonstrates how to root this type of device.
Challenges may arise during the rooting process, so maintaining patience and diligently following the provided instructions is crucial. An issue I encountered was referred to as "bricking," and in both instances, it was a soft brick. The first time, my initial reaction was panic, resulting in unintended consequences. If frustration sets in, it's advisable to step away temporarily. In the second instance, I quickly recognized my mistake, set the device aside, and worked on finding a solution. Ultimately, I successfully resolved the soft brick by sideloading factory images one by one, allowing me to position the device for a factory reset. How did I soft brick the device? It happened when I mistakenly moved the factory image onto the device twice, including placing it in the incorrect folder. Consequently, the device couldn't read a proper operating system, trapping it in an initial boot loop.
On certain occasions, I acquired devices that proved challenging to put into bootloader mode due to a lack of carrier unlocking — despite being sold as a carrier unlocked device. It's advisable to conduct this test immediately upon receiving the device. Doing so allows you to identify any issues promptly and facilitates the possibility of returning the device within an appropriate timeframe if necessary.
The application and tools that will be utilized within this blog:
Android Factory Images: https://developers.google.com/android/images
Magisk: https://github.com/topjohnwu/Magisk
SDK Platform-Tools for Windows: https://developer.android.com/tools/releases/platform-tools
Root Checker for Android: https://play.google.com/store/apps/details?id=com.joeykrim.rootcheck&hl=en_US&gl=US
To delve deeper into the subject of synthetic testing, you can explore the insights shared in the following blog post: Creating Synthetic Test data.
You can also check out Hexordia’s Mobile Android Analysis Course Android Analysis and Creating Mobile Test Data.
Rooting a Google Pixel 6a
1. Set up device and plug device into computer using USB connection.
2. Open “Setting”.

3. Navigate to and select “About Phone.”

4. Scroll down until there will be a Build number (make note of it).

5. Click on “Build number” 7 times, there will be a countdown to becoming a developer. Once you
reach the final input, the phone will ask for credentials if there are any, ex: pin number.

6. Click the arrow at the top to go back to main settings and select “System.”

7. Under System, “select” “Develop options”.

8. Turn on “Stay awake”.

9. Turn off “Automatic system updates”.

10. Turn on “USB debugging”.

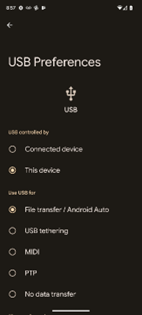
11. Change USB Preferences:
Settings ➡️Connected devices ➡️ USB, select, ““File transfer / Android Auto”.
(Of note, this will have to be done several times throughout this process).
12. Downloaded latest version of platform-tools found here: [1]
13. Once downloaded, “extract” files using extraction tool of choice. For the purposes of this
document 7-zip will be used.

14. “Open” platform-tools folder and type “cmd” in the search bar. This will open the command
prompt.

15. Run “adb devices” in the command prompt. It may say, “unauthorized”.

16. On the device, a pop may occur to “Allow USB debugging?” Select “Always allow from this
computer” and select “Allow”.

17. Run “adb device” command again in the command prompt. It should now just say,

18. Run command “adb reboot bootloader”.

19. Make note of the “Bootloader version” name. Ex: bluejay

20. Navigate to https://developers.google.com/android/images [2], select “Factory Images” top
left.

21. Search for Bootloader version name. In this example, search for bluejay and then Build number
(the one from step 4). Please note, this is only an example, do not use this unless it matches
the device being used.

22. Click “Link”, this will download the image.
23. This will be a zip file, “right click” select “show more options”, “7-zip”, “Extract files”, extract to
the location of choice.

24. Within this zip file, is another zip file, follow same the process in step 23.

25. Within the second image labelled “image- (image name)” there is a file named “boot.img”, this
is going to be moved to the device. Again, make sure the device is in file transfer mode and it
can be opened on the computer.
Example: Top portion of this image the device is open, bottom portion, the image is available.
26. Then drag that image into an empty spot within the device’s share storage
(Note: Do not place the file into a directory. It should be at the root of the internal storage)

This should be the result:

27. Now on device, open browser and type in “Magisk Gitbub” or this site directly
https://github.com/topjohnwu/Magisk
28. Scroll to bottom to Releases, at the time of this writing Magisk v26.1 is the latest. Click on
“Latest”.

29. Scroll again to bottom to “Assets” click on “Magisk-v26.1.apk”.

30. “File might be harmful” pop up may appear, click “Download anyway”

31. Next, as this is an unknown application, the browser is going to prompt to change a setting. On
this pop-up, click “Settings”.

32. Once directed to “Install unknown apps” click “Allow from this source”.
33. Another pop-up may occur asking “Do you want to update this app?” Select “Update”.

34. Magisk still may prompt “Requires Additional Setup” click “OK”. The device will reboot.
35. Once rebooted, navigate back to Magisk.
36. Click “Install” next to Magisk.

37. Select “Select and Patch a File”.

38. Select the three horizontal lines top left next to Pixel.

39. Select name of device, in this case “Pixel 6a”.

40. Select the “boot.img” that was pushed to device in step 26.

41. Select “LET’S GO ” in the top right corner.

42. Once complete, make sure the device again is in file transfer mode from step 11.
43. Open back up the device, as to not create any confusion later, rename the image that was
moved to device (from step 26) to boot2.img.

44. Open the Download folder. There will be a file named magisk_patched-.img, rename this image
to boot.img.

45. Copy this image to the platform-tools.

46. Type “cmd” in the search bar to pull up the command prompt.

47. Run command “adb device” to make sure the computer and the device are connected.

48. Run command “adb reboot bootloader”, the device should go into Fastboot Mode. [4]
49. Run command “fastboot flash boot boot.img”. [4]
50. Once complete, run the command “fastboot reboot”. [4]
51. Open Play Store and Search for “Root for Checker”, Install and Open.
52. “Agree” to Disclaimer.

53. Click “Verify Root”.

54. There will be a pop-up with Superuser Request. Click “Grant”, this will grant Superuser access
forever for the current computer the device is connected to.

55. Once granted, it will say “Congratulations! Root access is properly installed on this device!”

Conclusion
I hope this information proves beneficial for unlocking Android devices across various needs. Should you have any inquiries, please don't hesitate to reach out to us at Hexordia@Hexordia.com.