
Using Open Source Forensic Tools: Compiling from Code and Python Scripts

The Value of Compiling from Source
There is a fast-growing variety of forensic tools and parsers that are open- source and available for free. Having a wider range of tools available to us not only broadens the types of sources from which we can source meaningful data but also helps with validating that our tools are accurate by cross- referencing. Using these tools, however, is not always as straightforward as downloading an installer file off the internet. Independent developers making open-source software don’t typically have large amounts of resources and often work on these projects in their spare time, so you will often be responsible for compiling the project yourself. Becoming familiar with building projects from their source will greatly improve your flexibility as an examiner and open up countless new resources.
This blog will cover installation and usage of a few example tools across a couple of languages, going over the most common ways these projects are structured. The differences between building for Linux and Windows will be explored, with some tips and tricks to make the tools you build more convenient to use.
Handling Python Tools: Dependencies and Virtual Environments
One of the most common languages used for open-source forensics software is Python, which has its own methods of installing programs. Since Python is an interpreted language, scripts can be executed without being compiled; the Python interpreter can run them directly. For example, you can open a terminal, navigate to the directory with the file with `cd`, and run:

For the simplest tools, this can be enough, but many programs use imports, which allow for the use of pre-written code from other programs, called modules. Python ships with many modules preinstalled, but most of the time, you will need to install some of them yourself. The simplest way to do this is with pip, the Python package installer. Pip comes preinstalled with Python and can be used to install one or more packages at a time from the terminal:
![pip install package-name [package2-name] . . .](https://images.squarespace-cdn.com/content/v1/62ab5b933d903d4c55e5d716/e16e18cd-61c1-4167-8271-d5d113f49657/pip-install-package-name)
Any package on the Python Package Index can be downloaded and installed this way, allowing you to immediately use it in your programs. Many projects will have a file called “requirements.txt” that comes with the source code, it contains a list of the modules (and optionally, their versions) that you’ll likely have to download to get the tool running. These files can be read by pip using the -r switch, facilitating the easy installation of all the project’s stated requirements:

Installing Python packages like this installs them globally, which can be convenient as it allows any Python script on your system to use it, but this can also cause some significant issues:
Suppose you have two tools on your system: Tool A is a project that requires pandas version 1.5. Tool B is a different project that needs a feature only available in pandas version 2.1. If you install packages globally (the default behavior), you can only have one version of pandas installed at a time. Upgrading it for Tool B would break Tool A, and downgrading it for Tool A would break Tool B. Even worse, sometimes it won’t completely break, instead, changes in the module can cause silent changes in how the tool operates, which can jeopardize the reliability and repeatability of your results.
This is where virtual environments come in, and they are extremely useful. You can think of a virtual environment as giving each project its own private space. When you activate an environment for a specific project, the system’s command line will use the Python interpreter and packages from that environment only. You can install packages for individual projects independently from one another, avoiding the issue.
Creating a virtual environment for a tool is easy, simply navigate to the project folder, and type:

Note: On Linux, you may need to install the system package for venv. On Debian-based systems, this can be done with:

After this, a folder named “venv” should appear in your current directory, with another folder inside it called either “Scripts” (Windows) or “bin” (Linux/macOS). Inside that folder, you’ll find multiple “activate” scripts. Running them in your current shell will bring you into the virtual environment:
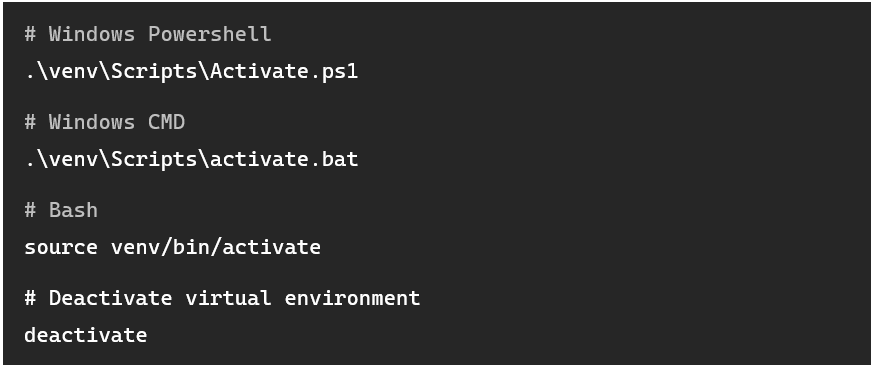
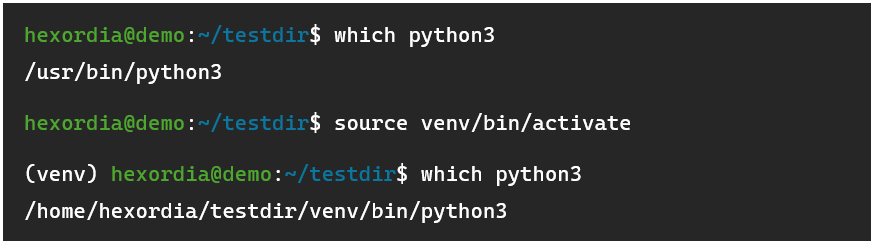
Your shell will make it clear that you are in a virtual environment, as the name of the virtual environment will be prepended to the shell prompt, and an isolated python interpreter will be used:
To exit the virtual environment:

With the virtual environment active, a tool’s dependencies can be installed without affecting other projects on the system. Note that when running the .py file for the tool, you’ll need to have the virtual environment activated, not just when installing dependencies.
Building and Installing Python Modules
From here, many tools will only require you to run a main script to get the tool working. However, some tools are different, for example, take Alex Caithness’ CCL Chromium Reader project, which is widely used for parsing LevelDBs. The project is actually a library, where you can build a Python module that can then be used in the included sample scripts or ones you build yourself. These projects typically come with a setup.py or pyproject.toml file.
Building a module is quite simple, and there are two ways to go about it, depending on what you want to do with it: If you only plan on using the scripts included with the module in the repository, you can simply enter a virtual environment and run:

This instructs pip to look for a setup.py or pyproject.toml file in the current directory (the dot) and follow its instructions to build the module into a wheel (think of these like module installer files), then install it. It even installs dependencies automatically so long as they are listed in those files. As long as the virtual environment is active, these modules can be imported into any script.
If you are working with multiple other projects that need a specific module to be manually installed, it can be handy to build the wheel separately, then simply switch to the main project’s virtual environment and install it, so you don’t have to recompile the project each time. Building wheel files like this is quite simple:

Doing this for CCL Chromium Reader results in this file being created:

After deactivating the virtual environment and switching to your main project’s virtual environment, you can install easily using ‘pip install’, using the path to the .whl file in place of the package name. The list of dependencies listed in the pyproject.toml or setup.py file is bundled with the wheel, so they will automatically be fetched by pip and install on their own.
Streamlining Execution: Shebangs, PyInstaller, and PATH
Having to manually switch into a virtual environment each time when starting a tool can be a bit cumbersome, but there are a few tricks that you can do to get around this. On Linux, files marked as executable can have an indicator that tells the system what interpreter to use to run it. This is referred to as a shebang, and it is found on the first line of scripts. It always starts with “#!” followed by the path of the interpreter. Here’s an example of what that may look like in a Bash script:

The operating system’s program loader reads the shebang, and uses the interpreter at that path to run the script. The trick with Linux is that we can modify the shebang to use the virtual environment’s `python3` interpreter rather than the system-wide one typically stored at /usr/bin/python3. This allows you to run the file directly, and the virtual environment will be used.
![(venv) hexordia@demo:~/ccl_chromium_reader$ chmod +x tools_and_utilities/dump_leveldb.py (venv) hexordia@demo:~/ccl_chromium_reader$ head -n5 tools_and_utilities/dump_leveldb.py import sys import csv from ccl_chromium_reader.storage_formats [...]](https://images.squarespace-cdn.com/content/v1/62ab5b933d903d4c55e5d716/c8f3b553-1c67-4d2c-9fc8-9ea27aeff3ed/modify-shebang-virtual-environment)
Above: ‘chmod +x’ to make the script executable, then custom shebang was added to the beginning. After deactivating the virtual environment, the script still works.
In Windows, shebang lines are not used. You could use a batch script to launch the Python file with a specific interpreter, but a much neater way of going about this is to use PyInstaller to generate executables. PyInstaller works by bundling the Python interpreter along with all necessary modules, libraries, and data files together into an executable file (You can also make Linux executables, it’s much neater than the shebang trick because of portability. Steps are the same). To start with PyInstaller, enter your virtual environment and type:

For applications without a GUI:

For applications with a GUI:

If the tool comes with an icon image, you can add this switch:
The output file will be inside a folder named “dist”. Note that there can be a few hiccups, as shown here:
![(venv) PS C:\Users\adamh\ccl_chromium_reader> pyinstaller --onefile .\tools_and_utilities\dump\leveldb.py 174 INFO: PyInstaller: 6.16.0 [...]](https://images.squarespace-cdn.com/content/v1/62ab5b933d903d4c55e5d716/76216f11-486b-4bad-926c-040d7a746e7d/dist-folder)
Output continues…
![9552 INFO: Build complete! The results are available in: C:\Users\adamh\ccl_chromium_reader\dist [...]](https://images.squarespace-cdn.com/content/v1/62ab5b933d903d4c55e5d716/f77f70ab-1238-4bfe-94c4-d8891b3ecdc8/dist-folder-continued)
Errors can occur that are not present when running the script normally, especially when using built-in functions for the Python interpreter.
This particular error happens because Python has some built-in functions that don’t get correctly packed into the executable. Thankfully the fix here is really simple, you’ll have to replace in dump_leveldb.py wherever it uses “exit()” with “sys.exit()”, and add “import sys” at the top of the file if it isn’t already there (but below the shebang, if you have or added one). The functionality of the f inal program will be the same. The downside of PyInstaller is mainly that you cannot make edits directly to the source code inside the executable if necessary, you’ll have to recompile to make any changes. Delete the associated .spec file that was just generated (was dump_leveldb.spec in this case), the folder for the program in the build folder and the .exe file within the dist folder, then run PyInstaller again.
![1050 INFO: Build complete! The results are available in: C:\Users\adamh\ccl_chromium_reader\dist (venv) PS C:\Users\adamh\ccl_chromium_reader> deactivate [...]](https://images.squarespace-cdn.com/content/v1/62ab5b933d903d4c55e5d716/08863790-a5dd-4901-9dfa-ac0bf46a8892/1050+INFO%3A+Build+complete%21+The+results+are+available)
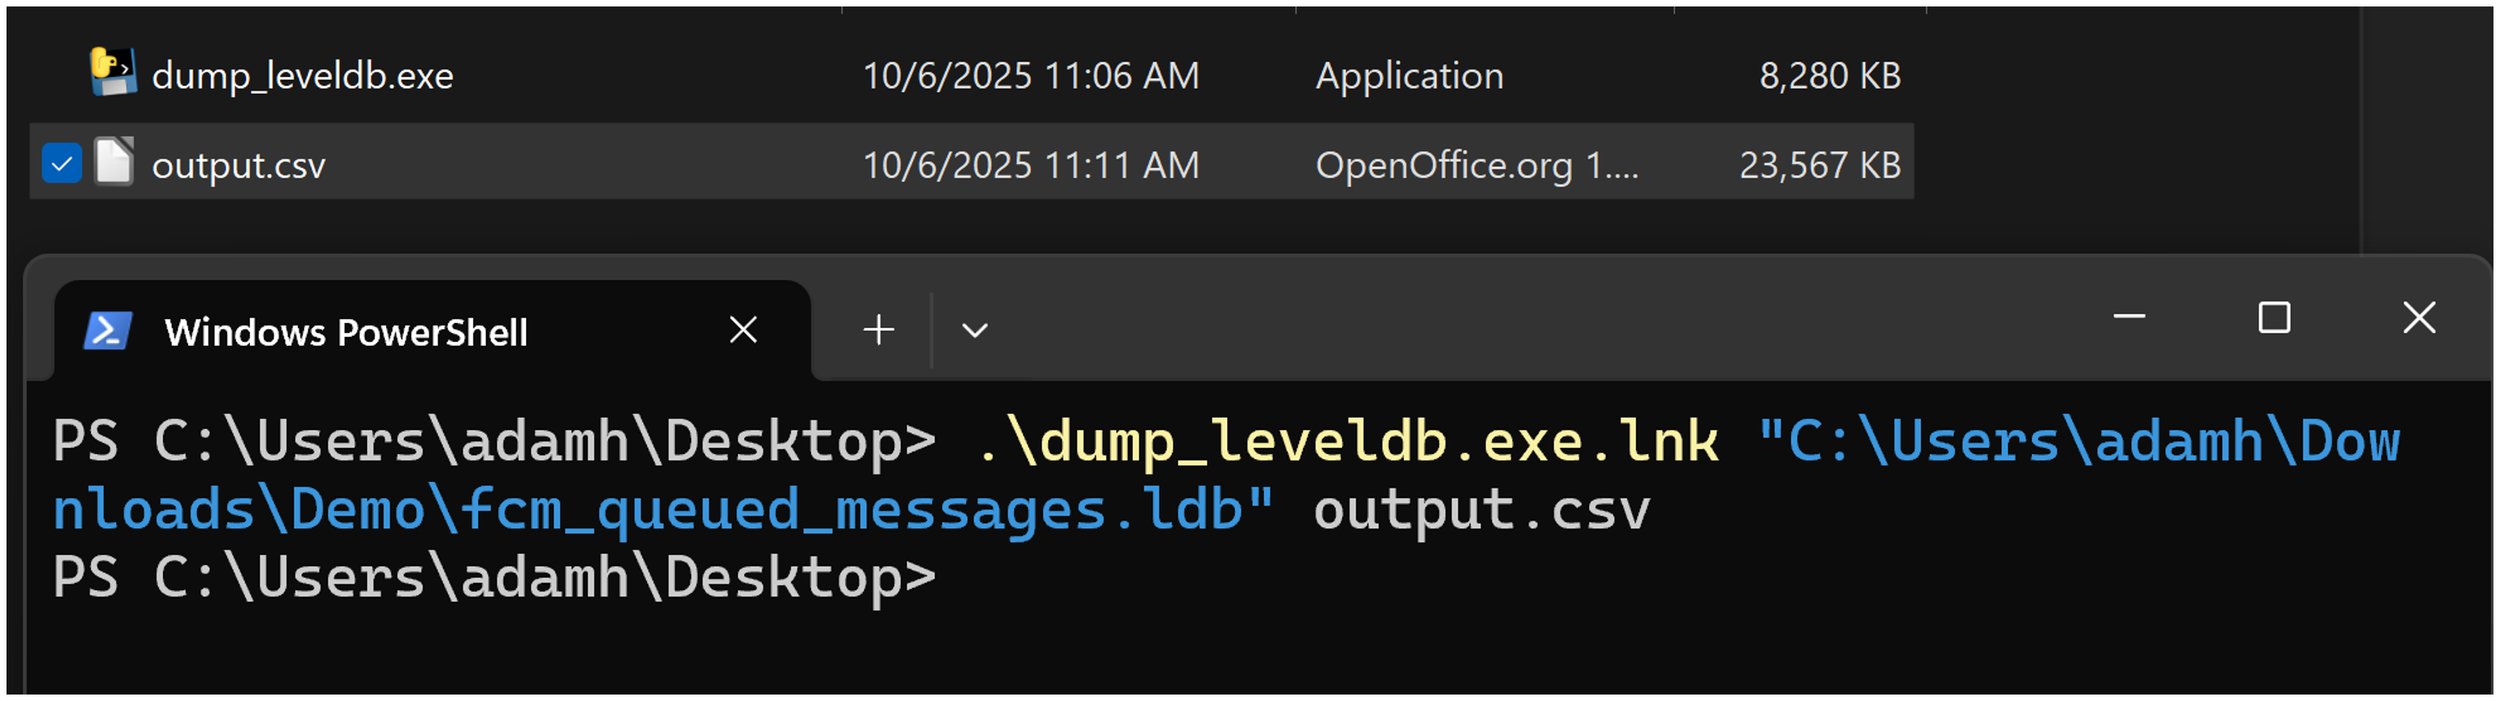
You can now either move this executable itself to the Desktop, or a slightly neater way is to create a shortcut, do so by right clicking, then select “Create shortcut”. The resulting file can be placed anywhere.
Note that when using a shortcut and when using relative paths, it is relative to the destination executable, not the shortcut, which can be a little confusing as you may be wondering where the output files went.
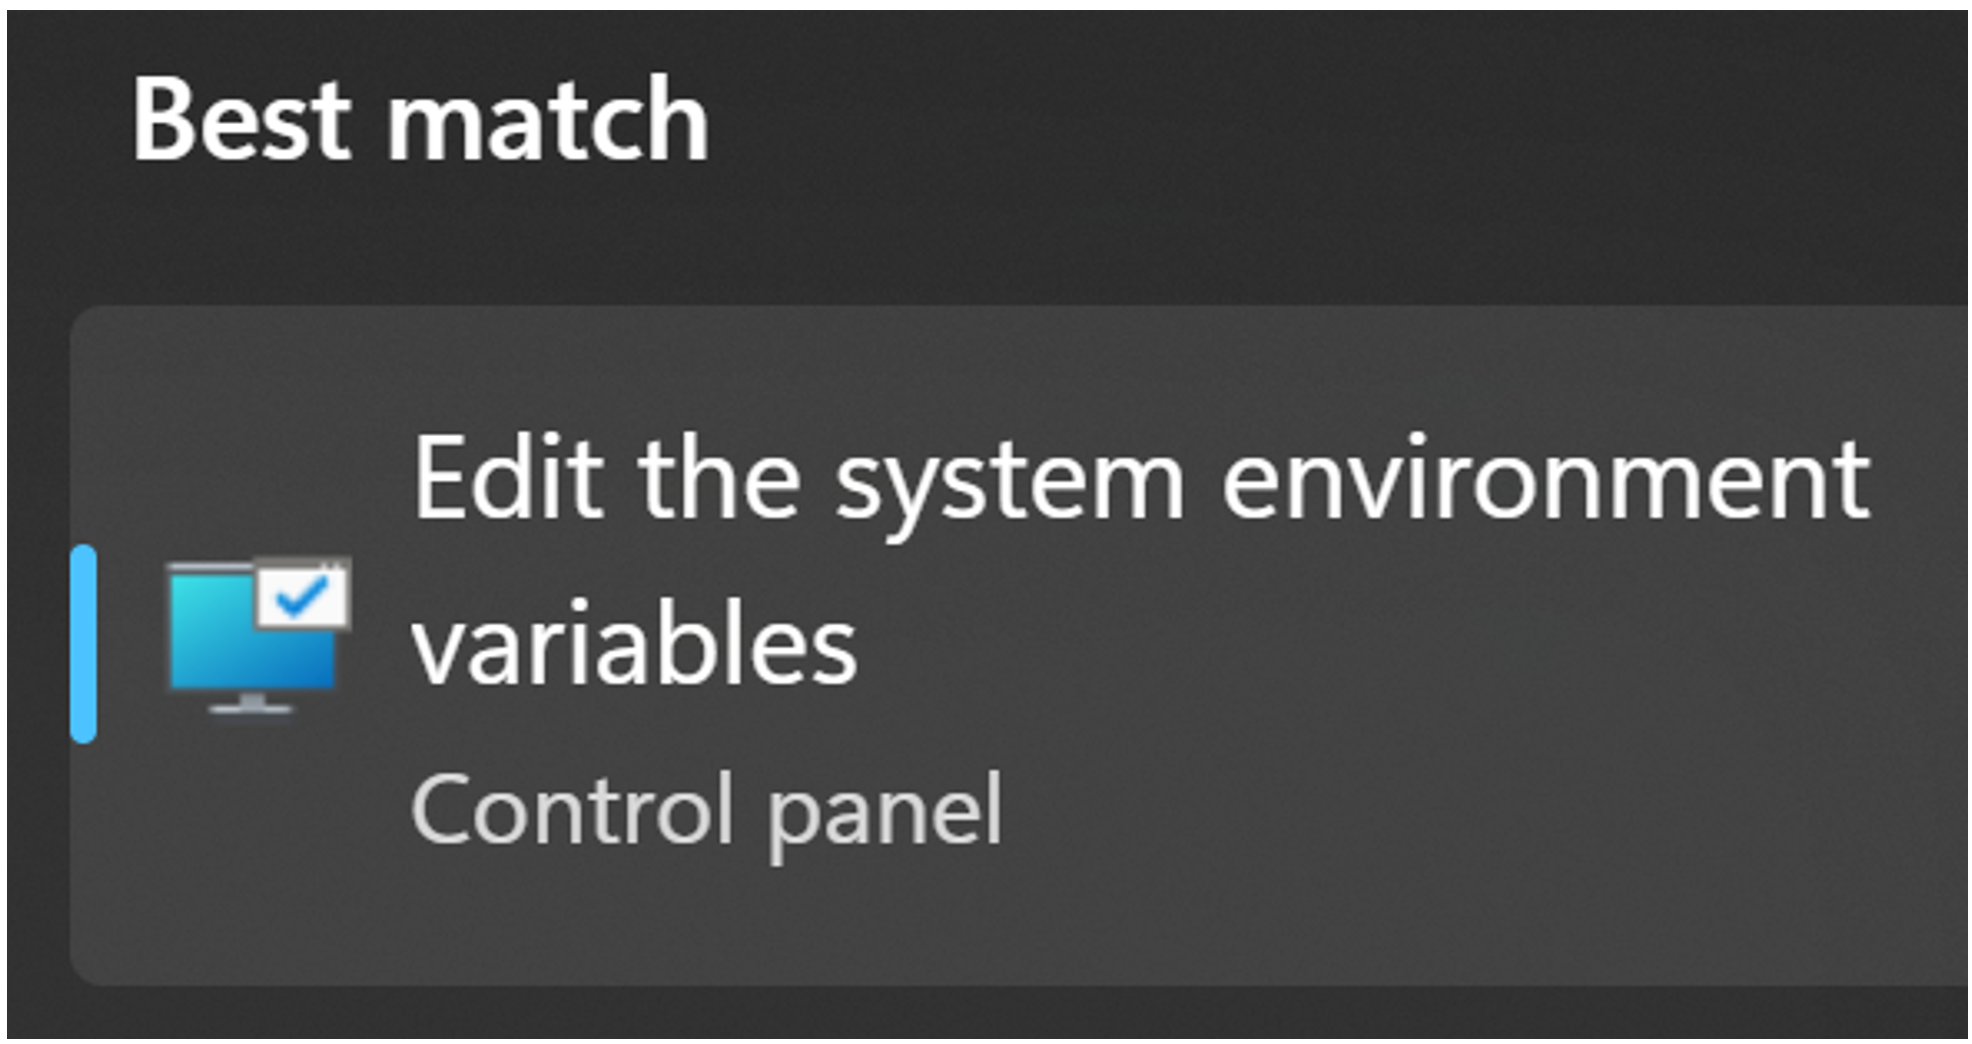
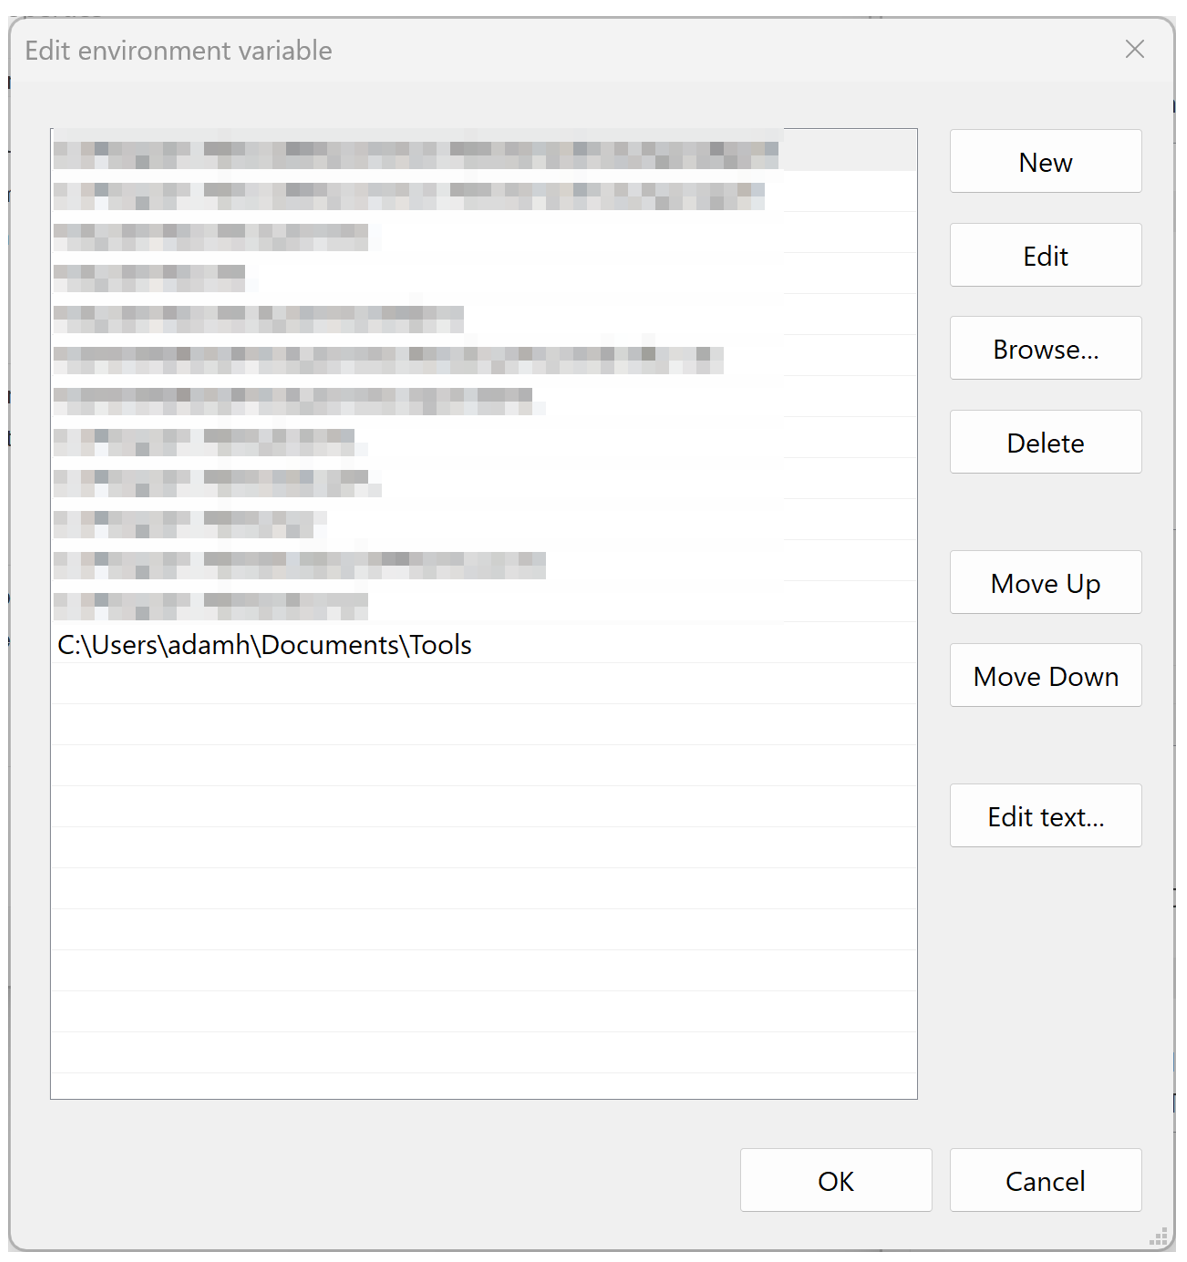
One way to get around this, especially for CLI applications, is to add the folder containing the executable to your path, allowing the executable to run from anywhere. To do this, open the environment variables editor by pressing the Windows key, then searching for “environment variables”. Choose “Edit the system environment variables”
Then, click “Environment Variables”, and then double-click "Path”.
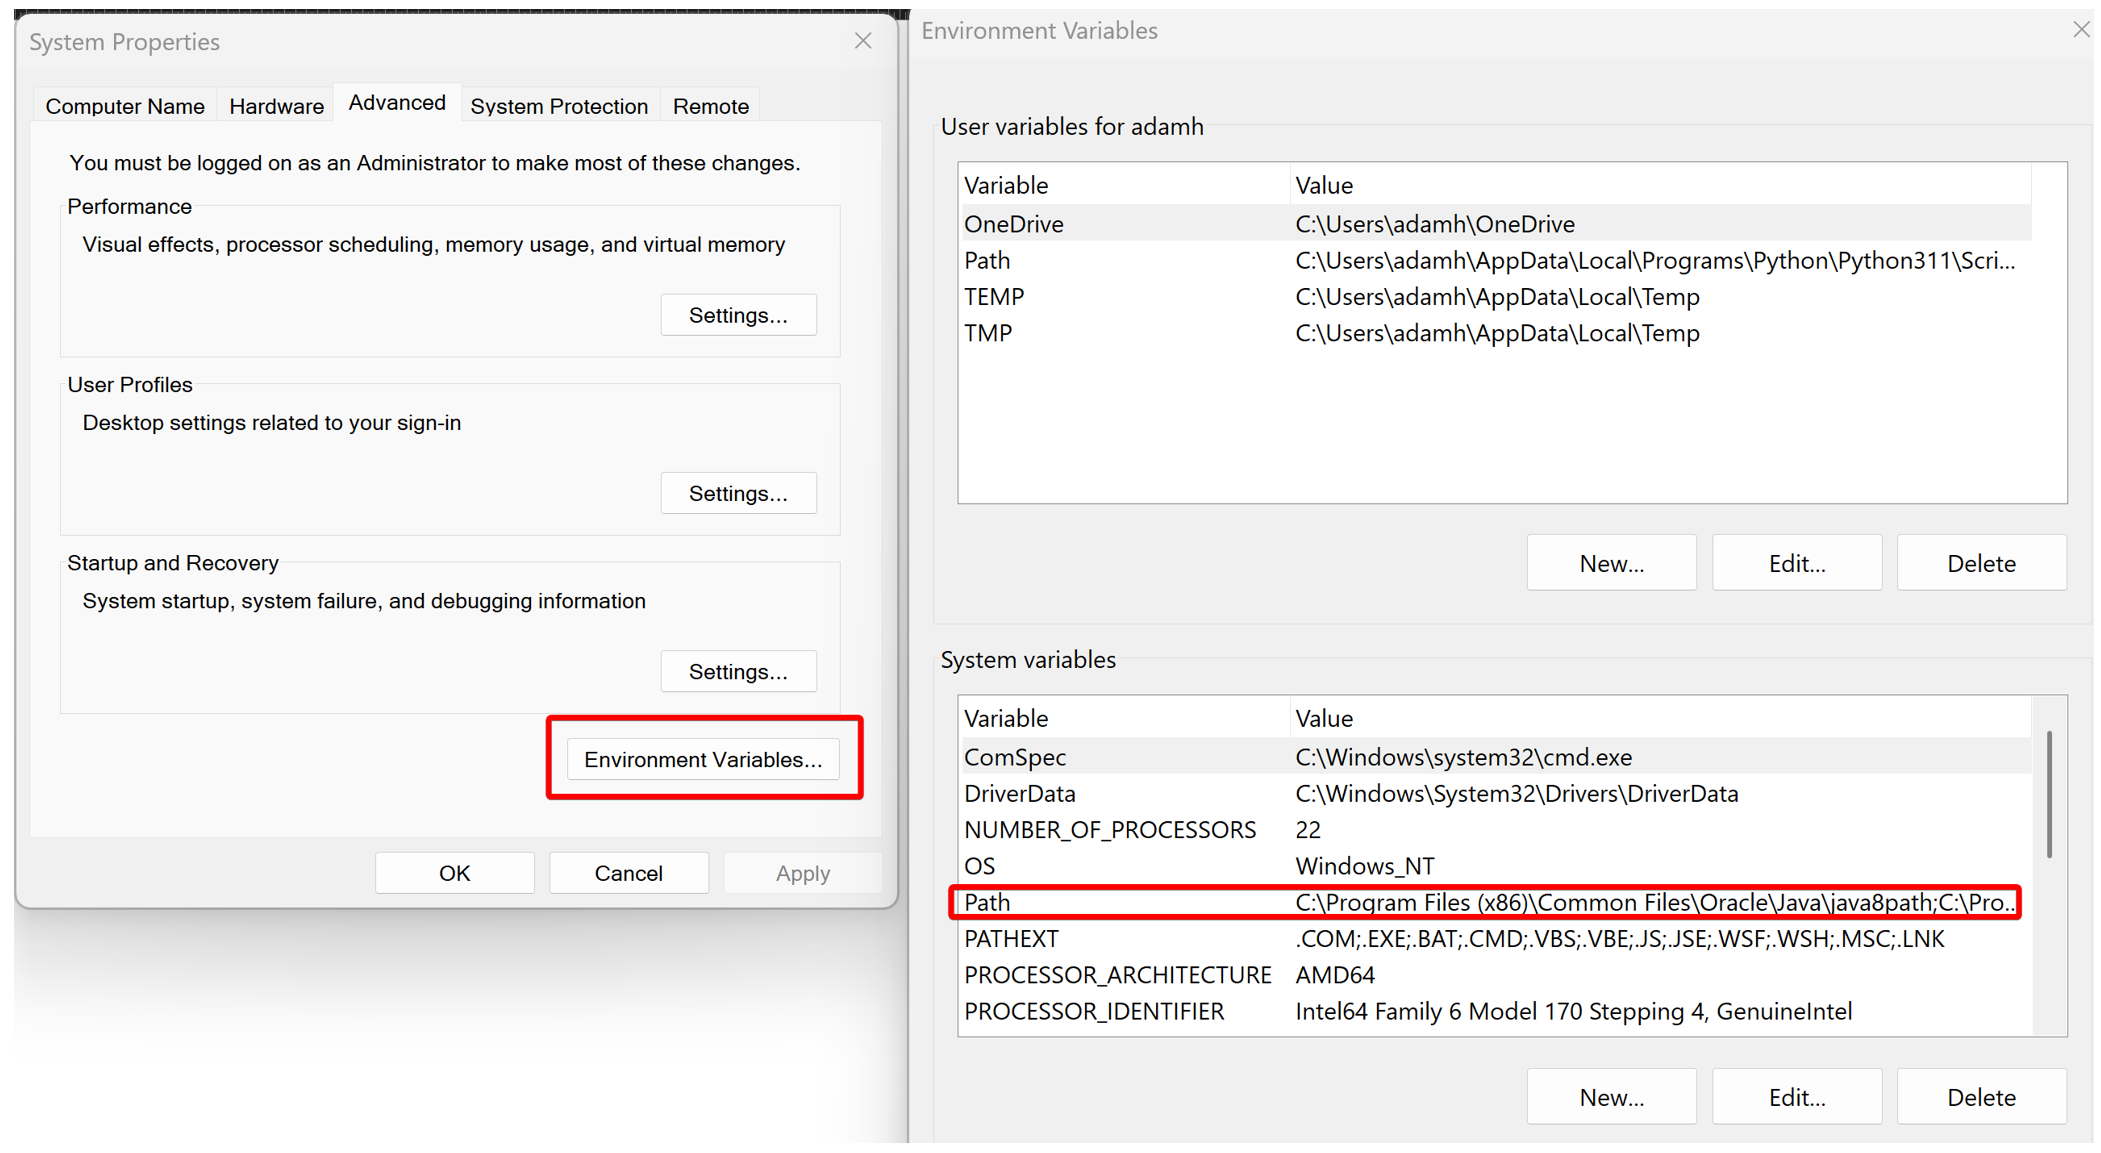
It’s highly recommended to make a “tools” folder somewhere on your computer for all your forensic tools, then move each .exe into it, rather than adding more folders to your path every time you install a tool. Then take the path to this folder, copy it, and double-click on an empty row to add it. Press “OK” on each window until the environment variables menu fully closes.
You will have to reload your shell for the changes to the path to take effect.

Compiling C/C++ Tools on Linux: A PhotoRec Example
Other more complex forensic tools, especially ones that need to run quickly or need low-level access to disks tend to use other languages than Python, with C and C++ being most common. While precompiled executable binaries are available for most of these tools, they may be old and have less features or not be compatible with your system. Additionally, just like with Python, missing libraries can change the way the program behaves, and it isn’t always obvious. PhotoRec is one such program that uses these languages, so it will be used as an example.
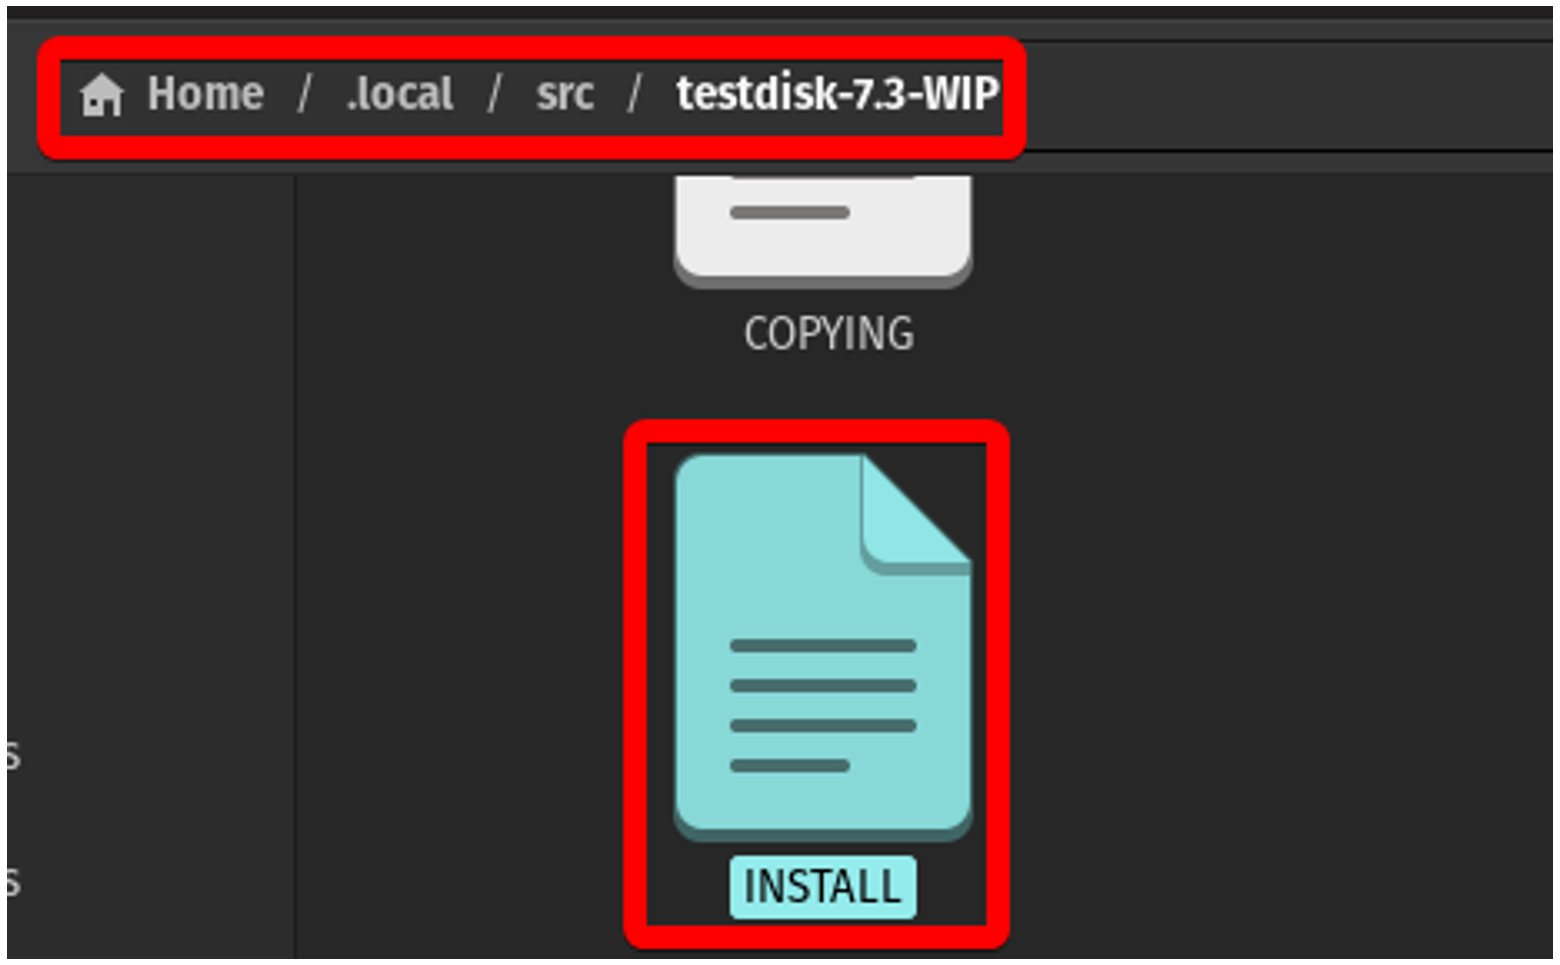
On Linux, PhotoRec doesn’t ship with a GUI executable (qphotorec on Windows), but it can be compiled rather easily. The source code for TestDisk and PhotoRec comes bundled on cgsecurity.org, where you can download with `wget`, unzip with `tar -xf`, and enter the folder (on Linux, the “technically correct” place to put this source code is its own folder within /usr/local/src/ or ~/.local/src/. Read more about these standards using `man hier`) .
Most projects will have either a file called README or INSTALL with specific information about how to compile the software. In the case of PhotoRec, there is an INSTALL file.
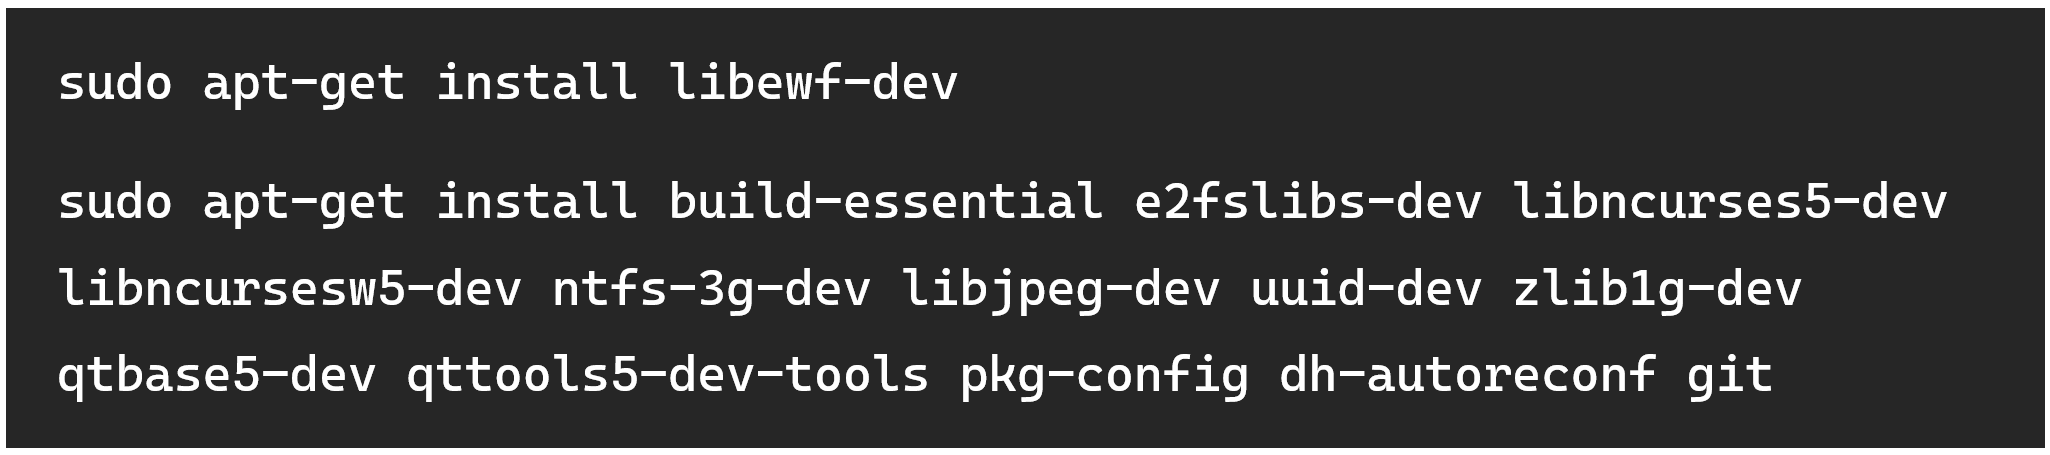
This contains instructions on what dependencies you will need to have installed and commands to run to go through the building process.

Within the file, you’ll need to locate instructions for the OS and distribution you are running. The test machine being used here is Pop!_OS, which is Ubuntu-based, so this blog will follow those. Instructions aren’t always perfect however, notice how the command to download the list of required libraries doesn’t include an EWF library like it mentions higher up? To work with .E01 files, this library must be installed in addition to the ones in the highlighted list.
PhotoRec has one step that needs to be done before the actual compilation and installation, which is to run a configuration script (not all programs have scripts like these). This is used to generate a Makefile specific to your system.

The Makefile is a special file that contains a set of rules used by the make build automation tool. Think of it as a recipe for a project. It tells make how to compile and link a program, but it can also be used to automate any task that involves dependencies.
The next step is to just run `make`. It will use the default target, which is to compile the PhotoRec and TestDisk binaries, but not install them. This might take a while, and you will see a lot of messages on your screen, but you can mostly ignore them unless they indicate critical/fatal errors that prevent you from continuing.
Next step is to install the binaries. This places the binaries that were just created into /usr/local/bin/ so they can be run as commands. This path is typically included in the $PATH environment variable in your shell, so executable files within this directory can be run from any location. You’ll need to run this with sudo, however.

Now just type `qphotorec` in your terminal to bring up the GUI, and it will pop up on your screen right away.
Added Convenience with Symbolic Links
This /usr/local/bin/ trick can be used for Python programs too. Instead of moving the script itself, which may need to stay in a specific directory, a symbolic link to the file can be made. The command is quite simple:
![# Format: ln -s [TARGET] [LINK NAME/PATH] sudo ln -s /home/hexordia/ccl_chromium_reader/tools_and_utilities/dump_leveldb.py/usr/local/bin/dump_leveldb](https://images.squarespace-cdn.com/content/v1/62ab5b933d903d4c55e5d716/6684b5ce-d958-415f-9c30-f39b484dec07/%2Fusr%2Flocal%2Fbin%2F+trick)
You can omit the ‘.py’ extension as shown above, or theoretically even change the name. Whatever the name of the symbolic link is, you’ll be able to use it in your shell to run the program, just like a command.
![hexordia@demo:~$ sudo ln -s /home/hexordia/ccl_chromium_reader/tools_and_utilities/dump_leveldb.py /usr/local/bin/dump_leveldb [ sudo ] password for hexordia: hexordia@demo:~$ dump_leveldb Usage: dump_leveldb <indir path> [outpath.csv] [...]](https://images.squarespace-cdn.com/content/v1/62ab5b933d903d4c55e5d716/d04c53c9-e168-4ca3-94b8-8f442d1c9611/use-symbolic-link)
A Note on Compiling for Windows
Most open-source forensics tools either work over Python or have a precompiled .exe file, it’s very rare that you would have to compile a Windows executable yourself. If you must, the steps do vary a lot, so following the instructions in the repository is highly encouraged.
The Golden Rule (Check the README!)
Mastering these techniques fundamentally enhances your capabilities as an examiner, giving you the flexibility to use the latest tools and the power to validate results by cross-referencing findings. This hands-on approach makes you a more agile and resourceful investigator. However, it's crucial to remember that every project is unique. Therefore, the single most important step is to always thoroughly read the project's README or INSTALL documentation first; these files are the developer's direct instructions and will always be your most reliable guide.